如果你想先体验一把语音版 ChatGPT,可以直接跳到文章最后点击演示链接。
引入 Breeze 重构前端页面
在上篇教程中,学院君给大家演示了如何基于 Laravel + OpenAI 快速构建 ChatGPT 网页版(GeekChat),在这个版本中,前端实现非常简单,只是通过一个 PHP 页面完成,如果想要基于现代前端技术栈完成更复杂的页面功能,需要引入前端框架进行重构。这里我选择了 Vue 框架,并通过胶水工具库 Inertia.js 粘合 Laravel 和 Vue,让前后端可以完全分离,又能很好地组合。
这一切都不需要我们自己做什么额外的工作,在 Laravel 10 中,使用官方入门套件 Breeze 扩展包提供的脚手架通过几个命令就能快速完成相关的初始化:
composer require laravel/breeze --dev
php artisan breeze:install vue
npm install
完成上面几个操作后,就已经在项目中集成了 Inertia 以及基于 Vue3 的前端依赖和示例模板,因为我们这里不需要登录认证和用户信息编辑,可以去除对应的代码,隐藏认证路由,然后把之前的 ChatGPT 聊天页面前端代码从 welcome.blade.php 通过 Vue 重写到 resources/js/Pages/Welcome.vue 中:
<script setup>
import { Head, Link, useForm, router } from '@inertiajs/vue3';
import { reactive } from 'vue';
const props = defineProps({
    canLogin: Boolean,
    canRegister: Boolean,
    messages: Array
})
const form = useForm({
    prompt: ''
});
const data = reactive({
    error: '',
    toast: ''
})
const chat = () => {
    form.post(route('chat'), {
        onStart: () => {
            data.error = ''
            form.reset()
            data.toast = 'GeekChat正在思考如何回答,请稍候...'
        },
        onFinish: response => {
            if (response.status >= 400) {
                data.error = '请求处理失败,请重试'
            }
            data.toast = ''
            scrollToButtom()
        }
    });
}
const reset = () => {
    axios.get(route('reset'))
        .then(response => {
            router.reload()
        })
}
const scrollToButtom = () => {
    const msgAnchor = document.querySelector('#msg-anchor')
    msgAnchor.scrollIntoView({ behavior: 'smooth' })
}
</script>

<template>
    <Head title="GeekChat - ChatGPT免费体验版">
        <link rel="shortcut icon" type="image/png" href="https://study.geekai.co/icon/geekchat.png">
    </Head>

    <div class="flex flex-col space-y-4 p-4">
        <div v-for="(message, index) in messages" :key="index"
            :class="[message.role == 'assistant' ? 'flex rounded-lg p-4 bg-green-200 flex-reverse' : 'flex rounded-lg p-4 bg-blue-200']">
            <div class="ml-4">
                <div class="text-lg">
                    <a v-if="message.role == 'assistant'" href="#" class="font-medium text-gray-900">GeekChat</a>
                    <a v-else href="#" class="font-medium text-gray-900">你</a>
                </div>
                <div class="mt-1">
                    <p class="text-gray-600">
                        <markdown :source="message.content" />
                    </p>
                </div>
            </div>
        </div>
        <div id="msg-anchor"></div>
        <!-- 处理中提示 -->
        <div v-if="data.toast" class="flex rounded-lg p-4 bg-green-200 flex-reverse'">
            <div class="ml-4">
                <div class="mt-1">
                    <p class="text-gray-500">{{ data.toast }}</p>
                </div>
            </div>
        </div>
        <!-- 响应错误提示 -->
        <div v-if="data.error" class="flex rounded-lg p-4 bg-red-400 flex-reverse'">
            <div class="ml-4">
                <div class="mt-1">
                    <p class="text-gray-100">{{ data.error }}</p>
                </div>
            </div>
        </div>
    </div>

    <form class="p-4 flex space-x-4 justify-center items-center" @submit.prevent="chat">
        <input id="message" placeholder="输入你的问题..." type="text" name="prompt" autocomplete="off" v-model="form.prompt"
            class="border rounded-md  p-2 flex-1" required />
        <button class=""
            :class="{ 'flex items-center justify-center px-4 py-2 bg-green-500 hover:bg-green-600 text-white rounded-md text-sm md:text-base': true, 'opacity-25': form.processing }"
            :disabled="form.processing" type="submit">
            <svg xmlns="http://www.w3.org/2000/svg" fill="none" viewBox="0 0 24 24" stroke-width="1.5" stroke="currentColor"
                class="w-6 h-6">
                <path stroke-linecap="round" stroke-linejoin="round"
                    d="M6 12L3.269 3.126A59.768 59.768 0 0121.485 12 59.77 59.77 0 013.27 20.876L5.999 12zm0 0h7.5" />
            </svg>
        </button>
        <button
            class="flex items-center justify-center px-4 py-2 bg-gray-400 hover:bg-gray-500 text-white rounded-md text-sm md:text-base"
            @click="reset">
            <svg xmlns="http://www.w3.org/2000/svg" fill="none" viewBox="0 0 24 24" stroke-width="1.5" stroke="currentColor"
                class="w-6 h-6">
                <path stroke-linecap="round" stroke-linejoin="round"
                    d="M14.74 9l-.346 9m-4.788 0L9.26 9m9.968-3.21c.342.052.682.107 1.022.166m-1.022-.165L18.16 19.673a2.25 2.25 0 01-2.244 2.077H8.084a2.25 2.25 0 01-2.244-2.077L4.772 5.79m14.456 0a48.108 48.108 0 00-3.478-.397m-12 .562c.34-.059.68-.114 1.022-.165m0 0a48.11 48.11 0 013.478-.397m7.5 0v-.916c0-1.18-.91-2.164-2.09-2.201a51.964 51.964 0 00-3.32 0c-1.18.037-2.09 1.022-2.09 2.201v.916m7.5 0a48.667 48.667 0 00-7.5 0" />
            </svg>
        </button>
    </form>

    <footer class="text-center sm:text-left">
        <div class="p-4 text-center text-neutral-700">
            GeekChat体验版由
            <a href="https://study.geekai.co" target="_blank" class="text-neutral-800 dark:text-neutral-400">极客书房</a>
            友情赞助
        </div>
    </footer>
</template>
因为现在前端页面是通过 Inertia 作为中间胶水层渲染的,所以相应的渲染代码也要调整下:
public function index()
{
    ...
    return Inertia::render('Welcome', [
        'messages' => $messages->toArray(),
    ]);
}

public function chat(Request $request): RedirectResponse
{
    ...
    return Redirect::to('/');
}


public function reset(Request $request): RedirectResponse
{
    ...
    return Redirect::to('/');
}
最后,因为 Tailwind 也是通过前端编译引入的,所以记得在 resources/css/app.css 中引入 Tailwind:
@tailwind base;
@tailwind components;
@tailwind utilities;
更多详细代码这里就不一一列举了,完整的提交记录在这里:基于Inertia+Vue3重构GeekChat功能 · geekr-dev/geekchat@fd5ff6e
当然,你也可以通过 breeze 分支检出这个提交的所有代码:
git checkout breeze
完成以上工作可以运行 npm run dev 编译前端代码,然后运行 php artisan serve 命令启动本地 HTTP 服务器,就可以在浏览器中看到最新的 ChatGPT 体验版效果,和上篇的结果应该是一样的:
另外这里一个额外的工作是前端对 Markdown 文本的处理,这里使用了第三方组件 vue3-markdown-it,并将其注册为了全局组件,你可以在 resources/js/app.js 中找到它。
实现 ChatGPT 对语音的支持
之所以要做这个前端重构,不是为了用 Vue 而用 Vue,而是为了给接下来在前端页面添加语音组件做基础技术准备。
接下来,我们就来实现 ChatGPT 体验版对语音聊天的支持。
整体架构
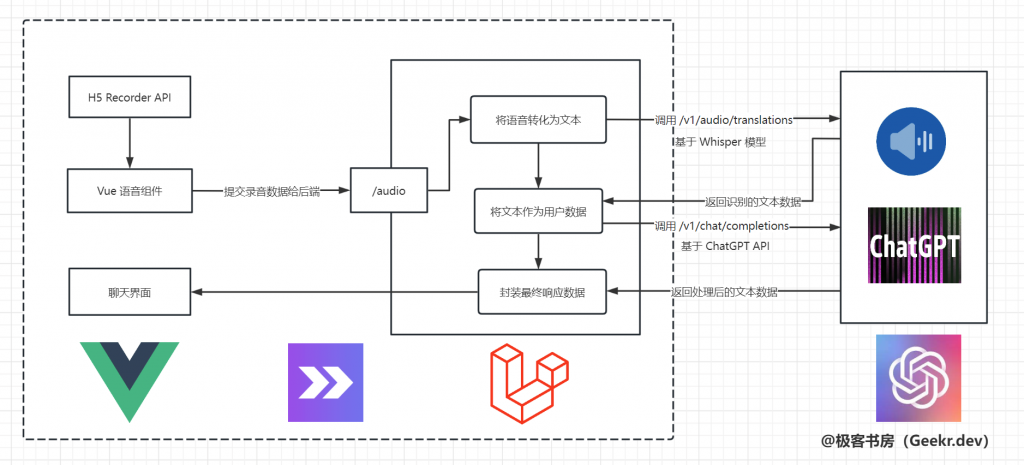
开始之前,需要梳理下整体架构,如下所示:
核心流程:
在 Vue 语音组件中,当用户开始录音后,基于 HTML5 提供的 MediaRecorder API 录制用户声音,当用户停止录音后,将声音数据流编码为常见音频格式(WAV/MP3等),通过 Axios 上传到后端音频处理接口 /audio,之后进入音频解析识别流程,这里调用的是 OpenAI 提供的 speech to text 接口,指定该接口基于 Whisper 模型进行语音识别,并转化为文本返回。再之后流程就和 ChatGPT 接口一样了,不再赘述,最后把处理结果通过文本返回到前端页面展示,从而实现完整的语音聊天功能。
可以看到,所谓的语音聊天,最终基于的还是文本,前面那么多操作,都是为了将语音转化为文本。
前端 Vue 录音组件
梳理好流程后,接下来就是按部就班地分模块编码实现。
首先,我们来编写 Vue 语音组件,这里我借鉴了 Github 上的开源项目 vue-audio-tapir,但是把 UI(包含对 Tailwind 的兼容)和业务流程做了调整,将小话筒整合到了输入框内,类似 Google 搜索框那样:

这个小话筒对应的就是一个独立的 AudioWidget 组件:
<template>
    <div>
        <icon-button :class="buttonClass" v-if="recording" name="stop" @click="toggleRecording" />
        <icon-button :class="buttonClass" v-else name="mic" @click="toggleRecording" />
    </div>
</template>

<script>
import Recorder from "../lib/Recorder";
import IconButton from "./IconButton.vue";

const ERROR_MESSAGE = "无法使用麦克风,请确保具备硬件条件以及授权应用使用你的麦克风";
const ERROR_TIMEOUT_MESSAGE = "体验版目前仅支持30秒以内语音, 请重试";
const ERROR_BLOB_MESSAGE = "录音数据为空, 点击小话筒->开始讲话->讲完点终止键,再来一次吧";

export default {
    name: "AudioWidget",
    props: {
        // in seconds
        time: { type: Number, default: 30 },
        bitRate: { type: Number, default: 128 },
        sampleRate: { type: Number, default: 44100 },
    },
    components: {
        IconButton,
    },
    data() {
        return {
            recording: false,
            recordedAudio: null,
            recordedBlob: null,
            recorder: null,
            errorMessage: null,
        };
    },
    computed: {
        buttonClass() {
            return "absolute right-0 top-0 h-full flex items-center justify-center mx-auto px-2 py-2 fill-current rounded-md text-sm cursor-pointer";
        }
    },
    beforeUnmount() {
        if (this.recording) {
            this.stopRecorder();
        }
    },
    methods: {
        toggleRecording() {
            // 用户点击按钮触发
            this.recording = !this.recording;
            if (this.recording) {
                // 开始录音
                this.initRecorder();
            } else {
                // 结束录音
                this.stopRecording();
            }
        },
        initRecorder() {
            // 初始化Recoder
            this.recorder = new Recorder({
                micFailed: this.micFailed,
                bitRate: this.bitRate,
                sampleRate: this.sampleRate,
            });
            // 开始录音
            this.recorder.start();
            this.errorMessage = null;
        },
        stopRecording() {
            // 停止录音
            this.recorder.stop();
            const recordList = this.recorder.recordList();
            this.recordedAudio = recordList[0].url;
            this.recordedBlob = recordList[0].blob;
            // 录音数据不为空触发上传
            if (this.recordedAudio && this.recordedBlob) {
                // 录音成功,先判断时长
                if (this.recorder.duration > this.time) {
                    this.errorMessage = ERROR_TIMEOUT_MESSAGE;
                    this.$emit('audio-failed', this.errorMessage);
                    return;
                }
                // 录音数据为空,不处理
                if (!this.recordedBlob) {
                    this.errorMessage = ERROR_BLOB_MESSAGE;
                    this.$emit('audio-failed', this.errorMessage);
                    return;
                }
                // 提交录音数据给后端
                this.$emit('audio-upload', this.recordedBlob);
            }
        },
        micFailed() {
            // 录音失败
            this.recording = false;
            this.errorMessage = ERROR_MESSAGE;
            this.$emit('audio-failed', this.errorMessage);
        },
    },
};
</script>
这里面包含录音对象初始化,开始录音、结束录音以及录音上传的逻辑,代码注释比较详细,就不详细介绍了,里面还使用到了 IconButton 组件、 Recorder API 以及音频编码实现,这些都可以在代码仓库中找到:geekchat/resources/js at master · geekr-dev/geekchat。
语音组件是嵌入在 Welcome.vue 页面中的子组件,而语音录制完毕需要触发父页面调用上传接口,这里子组件向父组件通信需要用到 $emit 函数触发:
<div class="relative w-full">
    <input id="message" placeholder="输入你的问题..." type="text" name="prompt" autocomplete="off" v-model="form.prompt"
        class="w-full first-letter:border rounded-md p-2 flex-1" required />
    <audio-widget @audio-upload="audio" @audio-failed="audioFailed" />
</div>
然后在父页面中调用对应的函数执行回调函数处理:
const audio = (blob) => {
const formData = new FormData();
formData.append('audio', blob);
data.error = ''
data.toast = 'GeekChat正在识别语音并思考如何回答您的问题,请稍候...'
axios.post(route('audio'), formData)
.then(response => {
data.toast = ''
location.reload();
scrollToButtom()
}).catch(error => {
data.toast = ''
if (error.includes('429')) {
data.error = '请求过于频繁,请稍后再试'
} else {
data.error = '处理语音失败,可能没录音成功(按下话筒图标->开始讲话->讲完按下终止图标,操作不要太快),再来一次试试吧'
}
scrollToButtom()
})
}
const audioFailed = (error) => {
data.error = error
data.toast = ''
}
对于上传录音操作,我们将会调用后端的 /audio 接口执行后续的语音处理操作。
后端音频识别处理
前端核心逻辑大概就这些,我们再来看后端的处理流程:
public function audio(Request $request): RedirectResponse
{
$request->validate([
'audio' => [
'required',
File::types(['mp3', 'mp4', 'mpeg', 'mpga', 'm4a', 'wav', 'webm'])
->min(1) // 最小不低于 1 KB
->max(10 * 1024), // 最大不超过 10 MB
]
]);
// 保存到本地
$fileName = Str::uuid() . '.wav';
$dir = 'audios' . date('/Y/m/d', time());
$path = $request->audio->storeAs($dir, $fileName, 'local');
$messages = $request->session()->get('messages', [
['role' => 'system', 'content' => 'You are GeekChat - A ChatGPT clone. Answer as concisely as possible. 把简体中文作为第一语言']
]);
// $path = 'audios/2023/03/09/test.wav';(测试用)
// 调用 speech to text API 将语音转化为文字
$response = OpenAI::audio()->transcribe([
'model' => 'whisper-1',
'file' => fopen(Storage::disk('local')->path($path), 'r'),
'response_format' => 'verbose_json',
]);
if (empty($response->text)) {
$messages[] = ['role' => 'system', 'content' => '对不起,我没有听清你说的话,请再试一次'];
$request->session()->put('messages', $messages);
return Redirect::to('/');
}
// 接下来的流程和 ChatGPT 一样
$messages[] = ['role' => 'user', 'content' => $response->text];
$response = OpenAI::chat()->create([
'model' => 'gpt-3.5-turbo',
'messages' => $messages
]);
$respText = '';
if (empty($response->choices[0]->message->content)) {
$respText = '对不起,我没有听明白你的意思,请再说一遍';
} else {
$respText = $response->choices[0]->message->content;
}
$messages[] = ['role' => 'assistant', 'content' => $respText];
$request->session()->put('messages', $messages);
return Redirect::to('/');
}
如果你忘掉了这块业务逻辑,可以对照前面的架构图看:
- 首先对音频文件进行验证,要求不超过10M,且必须是指定的音频格式;
- 然后调用 OpenAI 的 speech to text 接口,在我们使用的 SDK 中,对应的方法是
OpenAI::audio,注意这里指定了语音识别模型是whisper-1; - 将 OpenAI 接口返回的响应数据(从音频中解析出来的文本)作为用户输入的文本 prompt,进入 ChatGPT API 调用流程,完成对用户问题的处理,最终以文本返回(如果需要返回音频,这里再调用第三方 API 将文本转化为音频即可),至此,就完成了语音聊天的完整功能。
其他杂项
前后端分离后,需要注意 CORS 跨域请求问题,以及如果后端使用了 HTTPS,则前端资源文件对应的域名也要强制使用 HTTPS,对应的代码项目中都包含了,可以自己留意下,还有就是如果配置了前端资源使用 CDN,还要在.env环境配置文件加入 ASSET_URL=https://CDN域名/,以便让前端编译生成的资源 URL 域名切换到 CDN 域名。
最终效果
至此,我们已经完成了基于 Inertia + Vue3 重构前端页面,以及让 ChatGPT 体验版支持语音聊天咨询的全部编码工作,运行 npm run dev 编译前端资源,就可以在浏览器看到最终的效果了。你可以点击小话筒开启录音,录音完毕点击终止按钮结束录音,接下来,就会把录音数据提交给后端验证、识别、转化为 ChatGPT 流程完成聊天处理,最终以文本数据返回到聊天页面:
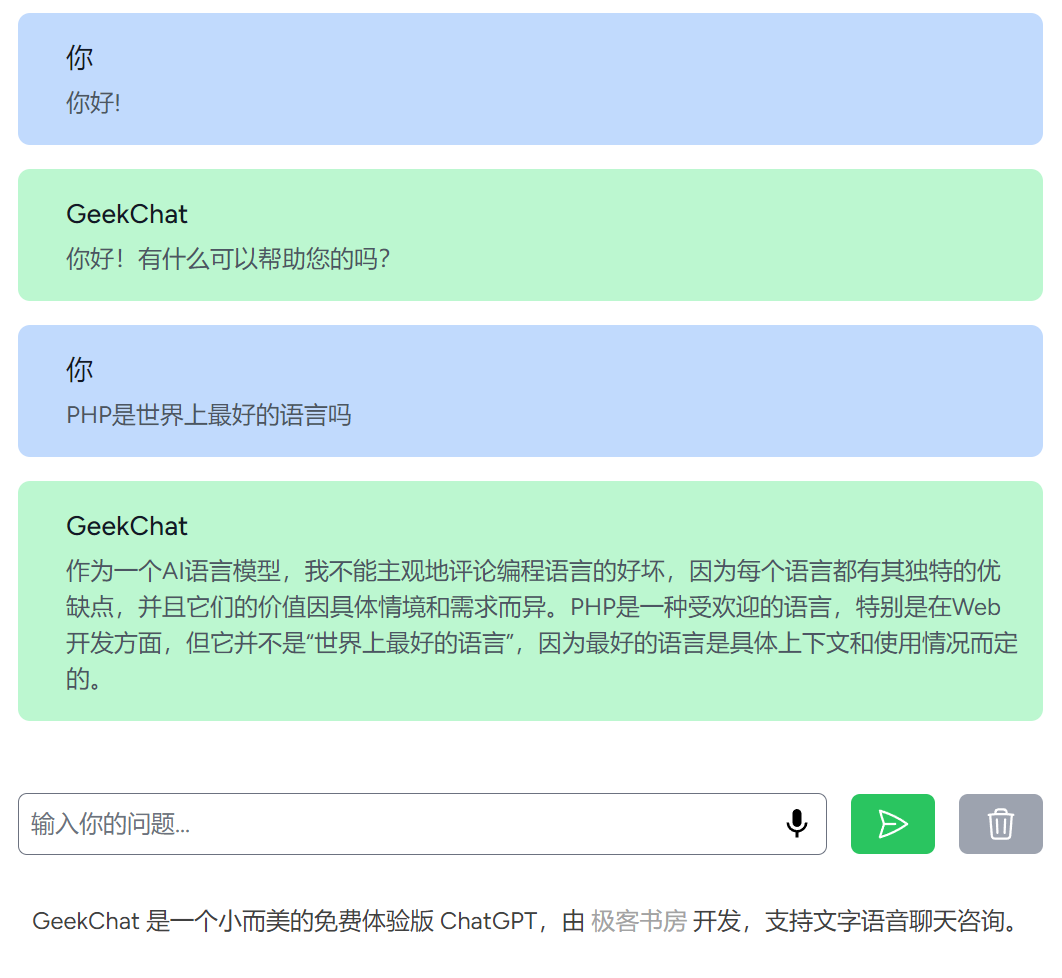
以上对话由语音聊天驱动生成。
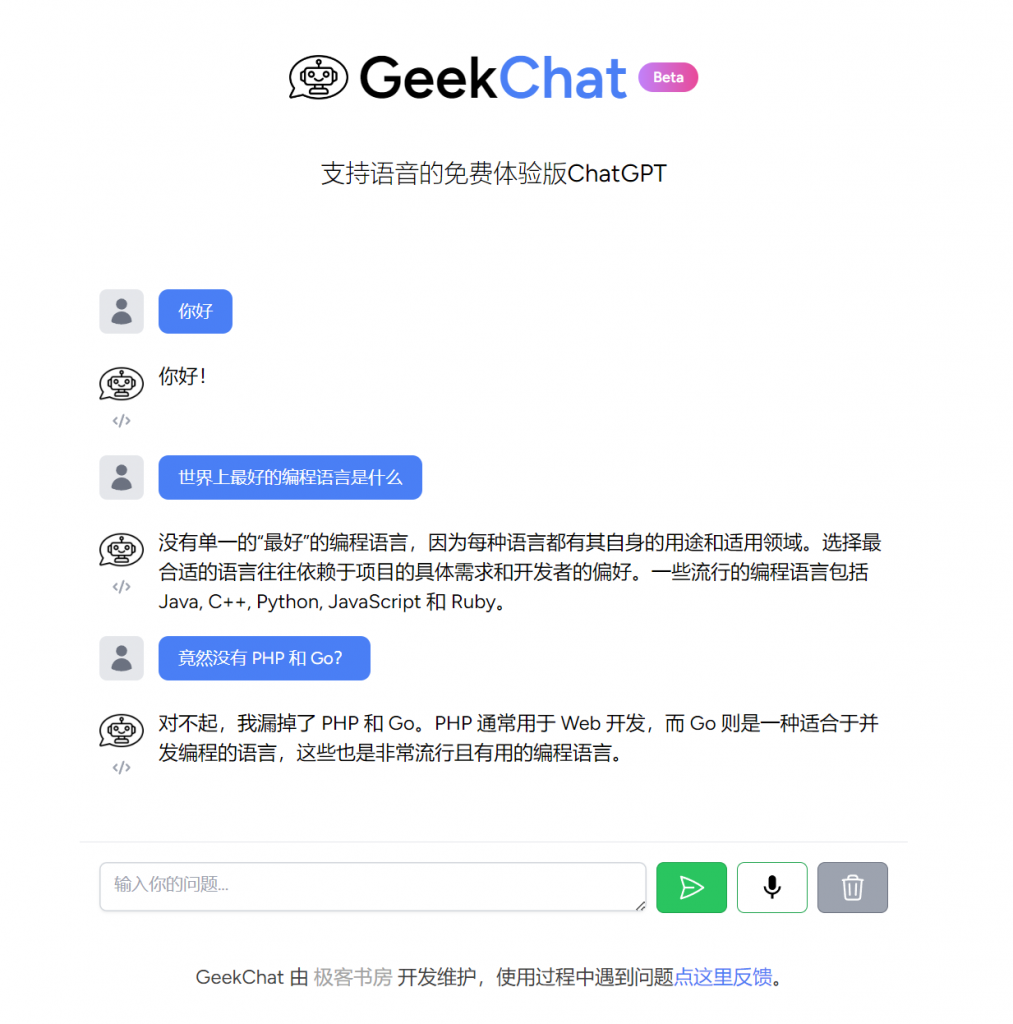
周末的时候,给前端 UI 又做了一次重构,让整体用户体验更加友好,这样一来,无论从界面、体验还是功能性来说,GeekChat 都具备一款小而美产品的基本素质了:
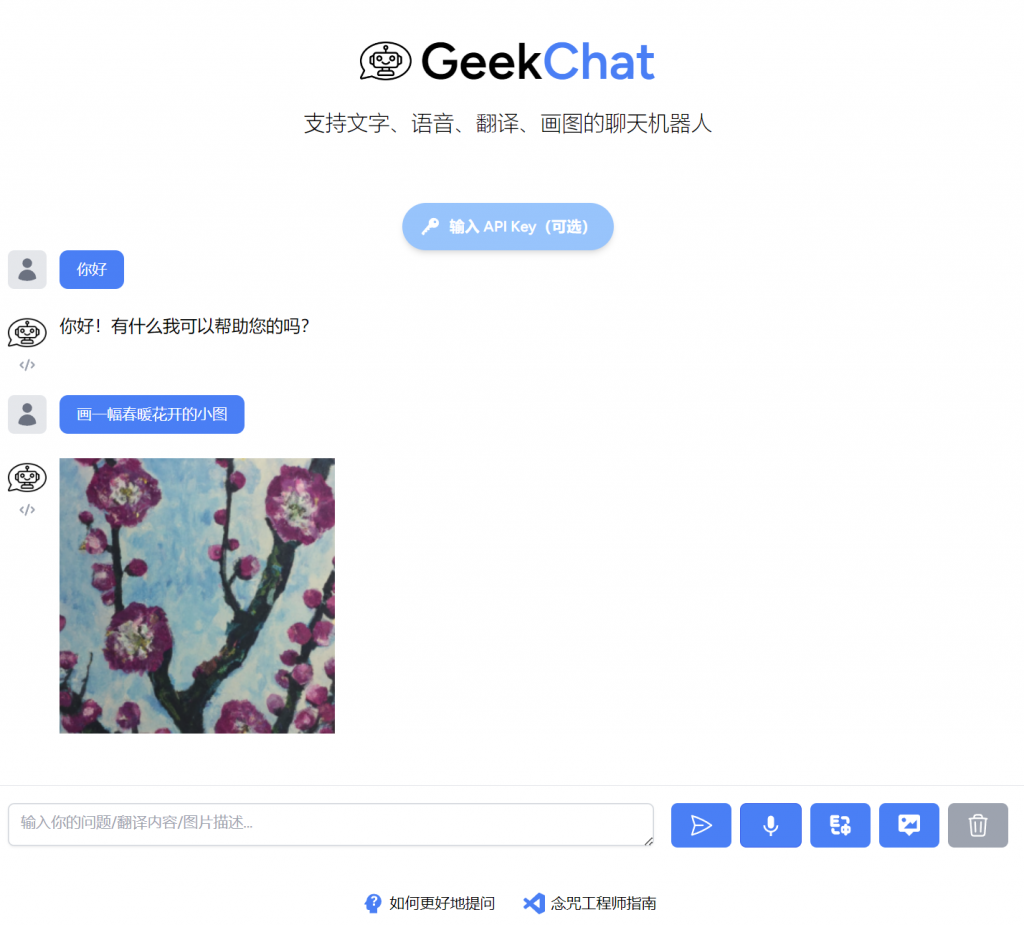
当然,你也可以直接在线上体验这个体验版:GeekChat,经过数次迭代,现在它已经成了一个支持文字、语音、翻译、画图的多功能聊天机器人:
完整的项目源码也已经开源到 Github:geekr-dev/geekchat: GeekChat,以后会持续迭代更新,欢迎 star。如果你有什么问题,欢迎通过评论框与我交流,或者通过扫描页面右侧的二维码加我微信。
